You may wish to download all the photos from iCloud to your PC as a backup, to free up space in your iCloud account, or for other reasons. The steps to pick and download all photos from iCloud to PC are listed below.
Many PC+iDevice users presently face the challenge of download all photos from iCloud at once to a Windows PC. The old key combination (Shift + Click) for choosing all images in the new iCloud online interface is no longer supported.
Instead, you can only pick them one at a time by simultaneously hitting Command + Click. While the iCloud manager program is installed and running on your PC, the option to download all of your photographs at once is now visible in your system tray. Learn how to use it to download all photos from iCloud at once in this article.
Download All Photos From iCloud to PC
On iCloud, there is no ‘Download All’ or ‘Select All’ button, as you may have seen. On iCloud, you won’t be able to choose multiple or all photos with your mouse. If you have thousands of photos in your iCloud account and want to download all photos from iCloud to your Windows computer, this can be a problem.
Fortunately, you can choose “All iCloud Photos” with a keyboard shortcut, and you’ll find two other ways to download all photos from iCloud to your Windows computer below.
1. Download All Photos From iCloud to PC Using a Keyboard Shortcut
You can use this approach to pick and download up to 999 photos from iCloud to your PC if the number of photos you wish to download all photos from iCloud to your PC is less than 1,000.
If you need to download more than 1,000 photos, proceed to the next step in this instruction, which is detailed below.
1. On your Windows computer, go to icloud.com.
2. Enter your Apple ID and password to access your iCloud account.
3. After you’ve signed in, go to the Photos tab.
4. Go to the Photos Tab in iCloud Photos and click on the first photo.
5. Hold down the Shift, Ctrl, and Alt keys while pressing the Down Arrow Key to select all iCloud photos.
Note: You can also click on the last photo at the bottom of the page.
6. Once you’ve selected all the photos, click the Download icon to start the process of downloading all of your iCloud photos to your computer.
Unless you change the default settings, all iCloud photos are downloaded to your computer’s “Downloads” folder.
2. Using iCloud for Windows, download all of your iCloud photos to your PC
The only way to download more than 1,000 photos from iCloud to your PC at once is to download and install the ‘iCloud For Windows application.
1. On your computer, download all photos from iCloud for Windows application.
2. Once downloaded, double-click the iCloud Setup file and follow the on-screen instructions to install iCloud for Windows on your computer.
3. When prompted, enter your Apple ID and password to sign in to your iCloud Account.
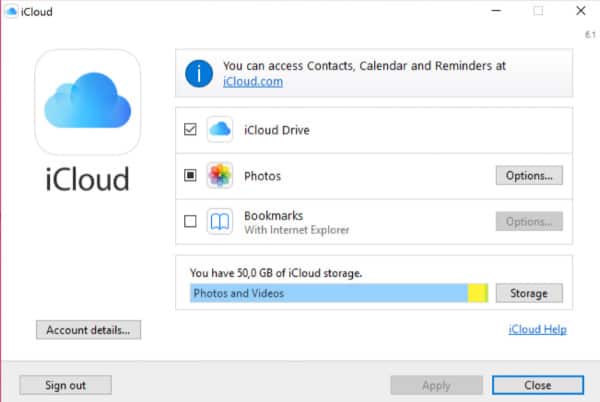
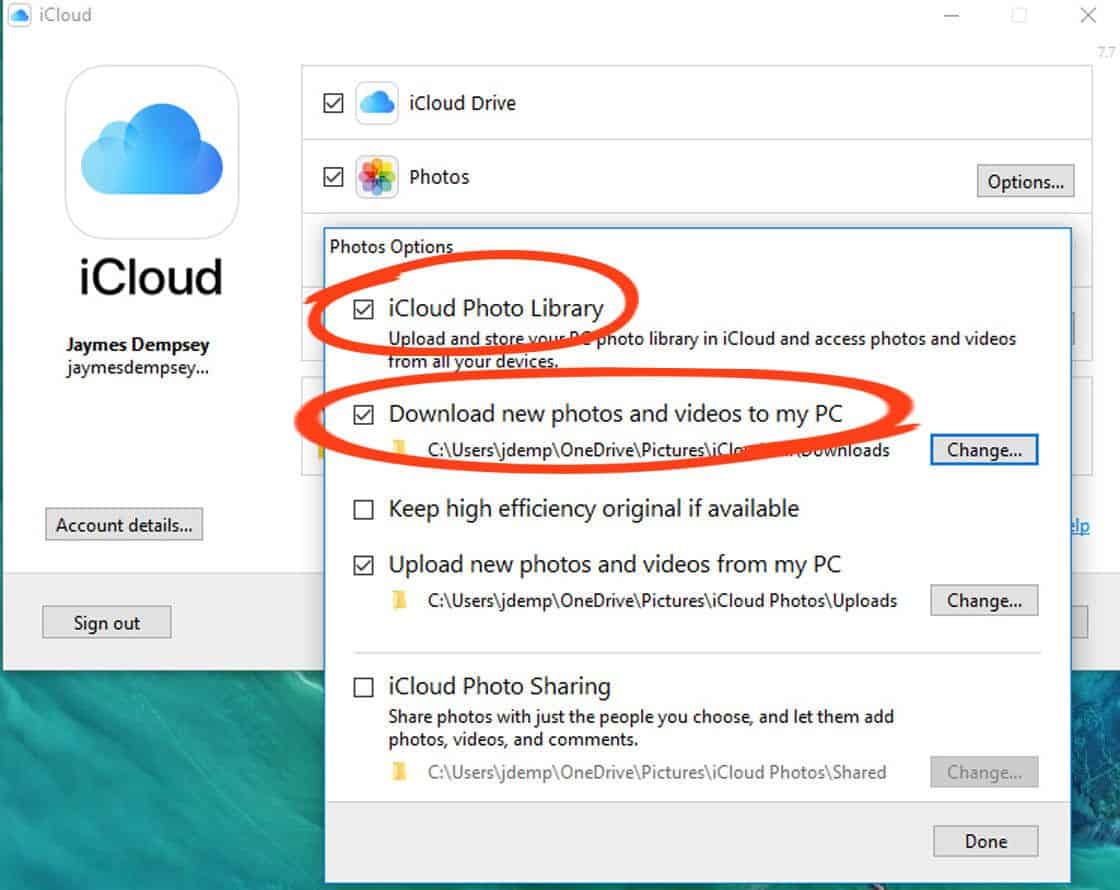
4. On the following screen, click in the tiny box next to “Photos” to select the Photos option.
Select iCloud Photo Library from the pop-up menu and click “Done.”
Note: If you select “Change,” you may change the iCloud download location.
5. Click Apply to begin the process of syncing all of your iCloud photos to your computer’s Downloads folder.
6. Once all of your iCloud photos have been downloaded, launch File Explorer on your PC.
7. In the File Explorer window, in the left pane, pick the the iCloud Photos tab. Click the Downloads icon in the right-hand pane.
8. On the following page, select the Downloads folder to view all of your iCloud Photos, which are organized into subfolders.
You can back up your downloads folder by copying it to your desktop, USB drive, or any other location on your computer.
ICloud can be added to the Windows Start Menu or Task Bar.
You may add the iCloud icon to the taskbar by clicking on the Start button > right-clicking on iCloud > More > Add to Taskbar. iCloud can be pinned to the taskbar to make it easier to access. Important: Before you disable iCloud Photos, make sure you copy all of your photos from Downloads to a different folder.
iCloud WebApp is a service provided by Apple
Unfortunately, Apple has altered some aspects of the iCloud program, and the solution described above is no longer valid for later versions.
As a result, we’ll use the most up-to-date approach to download photographs and videos in bulk from the website at this stage.
Because of this:
- Using your Apple ID, log in to iCloud online.
- If you don’t already have an account, you’ll need to create one.
- Navigate to the top by clicking the gallery button.
- Select a photo, hold down shift, and then select the last photo.
- There is a 1000-item restriction per session, so make sure you don’t choose more than that.
- The files will be downloaded as a zip file to the PC.
Make sure your iPhone’s iCloud sync is turned on.
Final Thoughts
This solution worked for me on the most recent version of the iCloud Manager for Windows (file version 7.3.0.20). Be aware that this technique may become obsolete in the future when a newly redesigned version of the software is published. So, please let me know in the comments section below whether this worked for you. When Apple modifies the rules, I’d like to update the article.


